
Why Businesses Should Embrace Cloud Computing
Cloud computing is a term that’s become all-too familiar in today’s ever-connected world of digital technology. From next-gen video game consoles like the Xbox One and PlayStation 4 to software applications and programs, cloud computing is everywhere you look. Even in the midst of this newfound popularity, however, many people are left scratching their head as they try to understand what exactly it is.
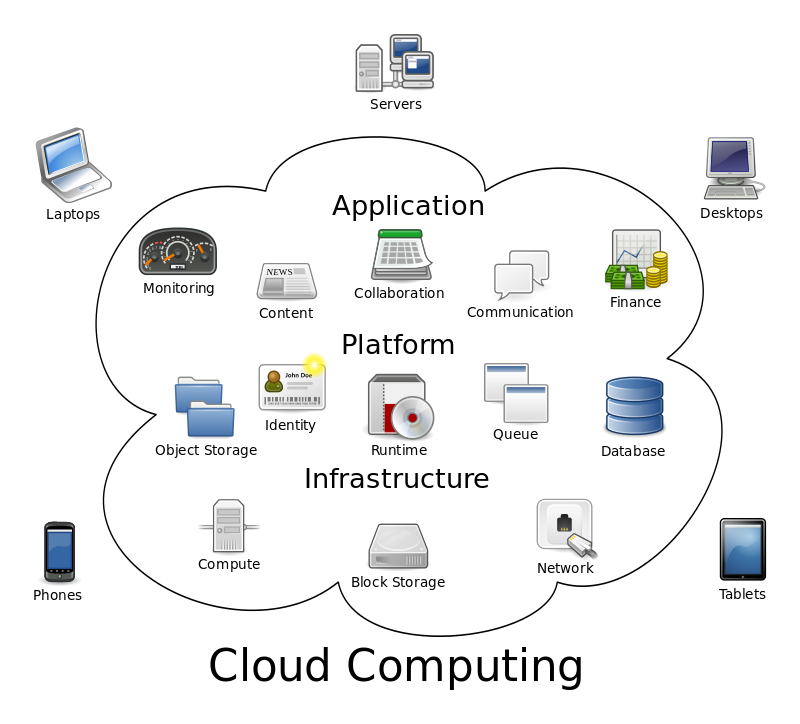
The short definition of cloud computing — which is also the easiest to understand — is that it’s computing power offered as a service rather than physical hardware. In other words, it features a central hub of high-end computers and/or servers that perform the computing operations of connected users. The “cloud” refers to this hub, which is usually compatible with a variety of different devices (desktop computers, laptops, smartphones, tablets, etc.).
There are several different reasons why businesses should embrace cloud computing technology, one of which is ease of maintenance. Cloud computing applications and programs are easier to maintain since they are only installed on the central hub (AKA the cloud). When an update is required, the operator must only perform maintenance on the cloud as opposed to updating hundreds or even thousands of client devices. This alone is reason enough for many businesses to invest in a cloud-based network solution.
Cloud computing is typically a more cost-effective approach to setting up an infrastructure. The resources are allocated more efficiently to prevent waste. Costs of cloud computing are also lowered since there’s less maintenance required, a benefit we previously discussed.
But the benefits of cloud computing for businesses don’t end there. Another reason why so many businesses prefer this type of setup is because it provides greater security. With everything stored on a central hub, there’s less risk for malicious attacks. IT teams can easily set up firewalls and perform regular security maintenance to prevent against malicious attacks.
Arguably, the greatest benefit of all is the simple fact that users can log into the cloud from a variety of different computers and devices. Assuming they have the proper login credentials to the cloud, users can access it from any connected to device. If an employee is vacationing out of state and needs to access his or her files to make an emergency change, they can do so by logging into the cloud from an internet-connected computer or device.
Did we leave out any other benefits of cloud computing for businesses? Let us know in the comments section below!
How To Fix The Quickbooks Runtime Error
 Do you experience the following Runtime error when attempting to open and/or use Quickbooks? Runtime Error! Errors such as this are frustrating to say the least, but it’s even more frustrating when you’re able to solve them. With a little bit of troubleshooting, however, you can resolve the Runtime error and regain full control and use of your Quickbooks software.
Restart Your Computer
First and foremost, you should restart your computer to see if it fixes the Runtime error. The steps required for performing a restart vary depending on the operating system, but most recent versions of Windows can be restarted by accessing File > Shut down/restart computer. Once your computer reboots, launch Quickbooks once again to see if the problem persists.
Run Quickbooks With No Data
Intuit also recommends launching Quickbooks with no data to resolve the Runtime error. Make sure QBW.EXE is NOT running by pressing Ctrl+Alt+Delete and browsing through the active processes. If you notice QBW.EXE listed, stop it by right clicking and choosing End process now. Next, right-click on the Quickbooks icon, press and hold Ctrl and click Open. You will now have access to Quickbooks without data being connected to the account.
Suppress Open Windows
A third possible solution to the Runtime error is to suppress open windows. Once again, check to make sure QBW.EXE is not running on your computer by pressing Ctrl+Alt+Delete. After verifying that QBW.EXE is not running, right-click on the Quickbooks icon, press and hold Ctrl and click Open. You should now press and hold the Alt button from the No Company Open Screen. Continue to hold the Alt key and press open to launch your company file. This essentially opens your company file but prevents all other windows from opening.
Rename QBW.INI File
As a last resort, you can attempt to rename the QBW.INI file to fix the dreaded Runtime error. Locate the file on your computer by using the Windows file search tool or by manually navigating to the appropriate location. Upon locating QBW.INI, right-click and choose rename. Intuit recommends renaming the file to .OLD extension, so your file should be QBW.OLD. Press Enter to save the changes.
Go ahead and launch Quickbooks like you normally would after renaming the QBW file. Hopefully, the new file extension will resolve the Runtime error, allowing you to once again access and use your Quickbooks software.
Converting an Accountant’s File To a Company File
 An accountant’s file (.qba or .qbx file formats) is a special type of file in Quickbooks which allows accountants, hence the name, to perform work on the account at the same time as other workers. The file is given a diving date — a starting and ending period for which changes are allowed — and there are certain restrictions on what the accountant can edit and what other workers can edit.
Think of an accountant’s file as a way to allow your accountant to perform work within Quickbooks at the same time as you or another worker. When two or more people are modifying an account at the same time, problems usually arise. Quickbooks, however, addresses this issue with the use of accountant’s copy files. The accountant is given limited access to the specified time period within the dividing date.
But what happens if you want to turn an accountant’s file to a traditional company file (.qbw)? Thankfully, Quickbooks makes conversions a quick and easy process that should only take a few minutes. By following the steps mentioned below, you can successfully convert your accountant’s file to a full-service company file.
Note: if a worker is client is running a newer version of Quickbooks, he or she may not be able to open the company file. This is why it’s important to cross-reference software versions before sending a company file.
To convert an accountant’s file to a company file, fire up Quickbooks and access Accountant’s Copy > Convert Accountant’s Copy to Company File/QBW. Select the accountant’s file that you wish to convert from the available options, enter a file name and location for the new company file, and click Save.
The final step in converting an accountant’s file to a company file is to remove the accountant’s copy file restrictions. This basically removes the limitations previously imposed on the account, providing full access to you or the respective client once again. Intuit recommends users consult with their accountant before removing file restrictions. Assuming you are given the green light, access File > Accountant’s Copy > Remove Restrictions. Confirm that you wish to make the changes by clicking Ok. Quickbooks will now remove the restrictions on the accountant’s file.
Note: with restrictions removed, you and your accountant will no longer be able to work simultaneously on the same file. Enabling the restrictions will reverse this change, however.
How To Make an Employee Inactive In Quickbooks
 Unless your business operates under the legal structure of a sole proprietor or one-man LLC or corporation, you’ll probably find yourself in a position where you need to remove an employee from Quickbooks. Allowing employees whom no longer work for your business to remain on the payroll could result in paychecks routinely sent to them. This issue is easily fixed, however, by adjusting some of the settings in your Quickbooks account.
The preferred solution to the scenario mentioned above is to set the employee to inactive. This keeps all previous records of the employee and any paychecks sent to him or her, but it also removes from the employee from the Active Employees list; thereby, eliminating the possibility of accidental paychecks being sent to him or her.
To make an employee inactive, launch your Quickbooks program and access the Employee Center by clicking the respective icon. Next, click on the employees tab to view all of your active and inactive employees. Scroll through the list until you find the employee whom you wish to make inactive, double-click on his or her name, and click the checkbox next to the option “Employee is inactive.” Congratulations, you’ve just set the employee to inactive! Sorry if you were expecting more, but that’s all it takes to deactivate an employee in Quickbooks.
So, what should you do if the employee wishes to return to your company/business as a paid worker? One option is to create an entirely new employee handle for him or her under your Quickbooks account. Being that all of the necessary information is already available in your account, however, the smarter approach is to simply reactivate the employee’s account.
To reactivate an employee, access the Employee Center once again, followed by clicking on the employee tab. Next, click the drop-down arrow at the top of the list and select All Employees. Any inactive employees in your Quickbooks account will have a large X next to their names. If you wish to make an inactivate employee activate again, double-click his or her name, and lastly, click on the box next to the option “Employee is inactive” (note: there should not be a check mark located in this box).
Quickbooks makes it a breeze to set employees to inactivate and to reactivate them. While most users take the longer, more tedious route of completely deleting employees, using the method described here is much easier.
How To Solve Quickbooks Error H202
 Do you experience an H202 error when attempting to open Quickbooks over a network or multi-user setup? This is a fairly common error that users report, and while having access to your account is frustrating, the problem is easily fixed by following a few simple steps.
Let’s first talk about what exactly triggers the H202 error. According to Intuit’s official website, this error appears when the Quickbooks software on one computer is unable to communicate with the Quickbooks software on another networked computer. So even if the server is set up to allow shared connections, there’s still something present that’s preventing the two computers from communicating to one another through Quickbooks.
File Doctor
Intuit’s File Doctor program makes fixing errors such as H202 as easy as a few clicks of the mouse. If you haven’t done so already, you should first attempt to fix your H202 error by downloading and running File Doctor.
Note: Intuit recommends downloading the latest version of File Doctor, because older versions may not effectively troubleshoot all problems.
Download the latest version of File Doctor from Intuit.com (click here). Once the download is complete (it’s a small file, so it shouldn’t take long), double-click to open and run qbfd.exe. This is the installer program that will place File Doctor on your computer. The program is set up to automatically run once the installation process if finished. Process by choosing your preferred settings for File Doctor, and when it asks you which type of problem to diagnose/fix, choose Network connectivity only.
Check Hosting
If Intuit’s File Doctor did not successfully solve your H202 error, your next course of action should be to check your hosting. Log in to Quickbooks through one of your workstations (not server or host) and access File > Utilities. The goal in performing this task is to ensure that your workstations are not set up to host multi-user access. If you notice the option Stop Hosting Multi-User Access on any of your connected workstations, select this option and confirm that you wish to stop hosting.
Create a New Folder For Quickbooks Company File
A third possible solution to error H202 is to create a new folder for your company file. Access the hosting computer, create a new folder, and set the Windows permissions to share it. You can then copy and paste your company file (extension .qbw) inside the folder.
How To Make Quickbooks File Smaller
 From customer records to years of purchase invoices and transactions, the average Quickbooks file contains a lot of data. Failing to clean up your company file could result in it becoming too large to reasonably move back and forth between different storage devices. Thankfully, however, you can make your Quickbooks company file smaller by performing some routine maintenance on it.
Condense Your Data
Quickbooks has a built-in utility program for shrinking the company file size. To access this program, go to File > Utilities > Condense Data. This tool deletes unnecessary data, which in turn reduces the overall file size. Before using Quickbooks Condense Data tool, you should familiarize yourself with its functions.
One of the features of the Condense Data tool is the ability to delete transactions before a specific date. If your company is new, or if you’ve only been using Quickbooks for a short period of time, this option may not offer much help in terms of shrinking your file size down. If you have years worth of data in Quickbooks, though, this tool will certainly help in reducing your company file size.
The Condense Data tool also offers the option to delete all data within the Quickbooks account while preserving lists, preferences and service subscriptions. Enabling this option is a highly effective way to free up space in your company file while keeping vital information that may be used at a later time.
A third function of the Condense Data tool is to delete all transactions while simultaneously creating a “period copy” (note: this option is currently only offered with Quickbooks Accountant version). Basically, this option allows users to create condensed company files which only includes transactions within a specified time period. In doing so, users can easily shrink their company file size while only sending data that’s relevant to the client.
Note: Quickbooks automatically creates an archive copy of your company file before engaging the Condense Data tool. Should you ever need access to information that was deleted with this tool, you can access it in the archives.
Using the Condense Data tool is a highly effective way to reduce your company file size by getting rid of unnecessary data. With that said, it’s important for users to check and make sure they do not need any of the data mentioned above before using the tool. Quickbooks does produce an archive of the file before condensing, but it’s better to only use the tool if you no longer need the data.
5 Reasons Why You Should Choose Hosted Quickbooks
 The Intuit Commercial Hosting Program allows authorized third-party vendors, such as MyVao, to install desktop versions of Quickbooks for clients to access and use. Rather than downloading and installing Quickbooks on their own computers, clients can install it on a server maintained by a participating vendor.
You might be wondering what (if any) advantages there are to using Hosted Quickbooks. Here, we’re going to discuss 5 reasons why you should choose Hosted Quickbooks over non-hosted.
#1) Access Quickbooks Anytime, Anywhere
One of the most notable benefits of Hosted Quickbooks is the ability for clients to access it anywhere, anytime. Normally, desktop versions of Quickbooks are limited to a single computer or device, and if the user isn’t around this device, he or she won’t be able to access it. Hosted Quickbooks, on the other hand, is installed on the cloud, allowing users to access it from any Internet-enabled computer or device.
#2) Extra Layer of Support
With Hosted Quickbooks, clients receive two layers of support: through Intuit and the third-party vendor. Should you ever find yourself in need of assistance, whether it’s setting up your account, performing maintenance, or any other task, you’ll have more options to choose from with Hosted Quickbooks.
#3) Automated Backups
Hosted Quickbooks perform automatic backups on a regular basis, protecting clients’ data from hardware and/or software failures. It’s disheartening for clients to see all of their hard work go down the drain due to a server crash. Thankfully, this isn’t a problem with Hosted Quickbooks, as client files are automatically backed up. Should the server ever fail, clients can rest assured knowing there’s a backup copy ready to be re-uploaded to the server.
#4) No Onsite Server Costs
Maintaining servers is neither cheap nor easy, but Hosted Quickbooks takes this burden off your shoulders by storing files on remote servers. This ultimately cuts down on server maintenance costs, time, and energy, allowing users to focus more on building and expanding their business rather than maintaining a server.
#5) Ease of Use
The sheer simplicity and ease of use associated with Hosted Quickbooks is an attractive feature that draws many users to choose it over non-hosted versions of Quickbooks. The only required program to access Hosted Quickbooks is secure virtual desktop connection — and an active Internet conenction, of course. Users can log in and access their desktop Quickbooks from any computer or device with an Internet-enabled virtual desktop connection.
How To Make an Account In Quickbooks Inactive
 Still struggling to figure out how to make an account inactive in Quickbooks? While there’s no option with this label, there’s a simple work-around that allows you to deactivate accounts. And if you wish to reactivate them at a later time, you are free to do so — assuming you follow the steps outlined here.
Delete The Account To Make It Inactive
The only viable way to make an account in Quickbooks inactive is to delete it. Once deleted, it’s removed from the Chart of Accounts and financial statements so it no longer shows up when performing routine operations.
Don’t worry, your reporting will remain the same, as deleting an account does not alter transactions balances; it merely adds the “deleted” annotation next to the respective account. You can still find all transactions connected to the deleted account by running a report.
Steps To Deleting an Account:
- Launch Quickbooks.
- Access the Company tab > Chart of Accounts.
- Scroll through the list of accounts and click on the one you wish to delete (AKA make inactive).
- Click on the Delete button.
- A message will appear, prompting you to confirm the deletion of the respective account. Double-check to ensure it’s the correct account and click Yes to confirm its deletion.
- Congratulations, you’ve just deleted the account from Quickbooks!
Note: unfortunately, there’s currently no method for deleting multiple accounts at once. If you need to delete two or more accounts from Quickbooks, you’ll have to follow the steps mentioned above for each account.
How To Reactivate a Deleted Account
- Launch Quickbooks.
- Access the Company tab > Chart of Accounts.
- At the top-right corner of your screen, you should see a button titled Related Reports. Click this button and proceed to the next step.
- Under Help Topics, select Deleted Accounts.
- Close out of the Help Topics window.
- Scroll through the list of accounts and click on the one you wish to reactivate.
- Click on the box titled Deleted, essentially undeleting the respective account.
- When you are finished, click Save to finish the process and reactive the account.
Note: if you delete a balance sheet account, you won’t be able to edit or delete transactions associated with that account until it’s reactivated. This is why it’s important to know the proper steps to deleting and reactivating accounts. If you find yourself in this situation, refer back to this post for detailed step-by-step instructions.
Help! Quickbooks Won’t Open
 Does Quickbooks cease to open when you attempt to double-click the file icon on your desktop computer? It’s frustrating when errors such as this appear, but it’s typically a quick fix that should only take a couple of minutes to rectify.
Restart Your Computer
Intuit recommends users first restart their computer to see if this resolves the problem. Various windows bugs and errors may trigger compatibility problems with Quickbooks; thus, preventing it from opening when you double-click the icon. A simple restart, however, can often fix this problem, allowing you to once again open and use your Quickbooks program.
Use The Shortcut Command
If restarting your computer did not fix the problem, you should attempt to open Quickbooks via the shortcut commands. Click on the Start button at the bottom-left corner of your Windows screen and select All Programs > Quickbooks. Next, right-click on the Quickbooks icon, hold down the Ctrl button, and click Open. This will attempt to run Quickbooks through the shortcut rather than primary path, which hopefully bypasses the error.
Access Quickbooks as Windows Administrator
It’s not uncommon for Windows users to have restrictions placed on the types of files and programs they can access. If you are unable to open Quickbooks, try logging into Windows as the administrator and then running the program. This is done simply by restarting Windows and entering the name and password of the administrator. Admins are given full, unrestricted access, which should allow you to run Quickbooks if there’s no other error or bug to blame.
Register Your Quickbooks, Again
Granted, users are required to register Quickbooks during the initial setup, re-registering your account could solve this issue. If you haven’t done so already, register your Quickbooks again by closing all open programs and running reboot.bat. When the operation is complete, open Quickbooks like you normally would. This will sync your account information with Intuit’s servers and hopefully fix this problem.
Kill QBW32.EXE Process
Open your Windows task manager via the taskbar or by pressing Ctrl+Alt+Delete and scan for the process QBW32.EXE. If you find this process running, kill it by selecting the option End Process. When you are finished, close out of the task manager and reattempt to run Quickbooks.
Reinstall Quickbooks
As a last ditch measure, you can attempt to fix this problem by reinstalling Quickbooks. Rather than placing it in the same destination as before, try installing it in a new folder.
How (And When) To Use Quickbooks File Doctor
 File Doctor is a program developed and released by Intuit that’s designed to fix common Quickbooks errors. If you’re experiencing the dreaded “Error 6000” message when attempting to run Quickbooks, for instance, you can use this tool to resolve it. Of course, this is just one of the many errors which are easily fixed with File Doctor. For more information on how, and when, to use Quickbooks File Doctor, keep reading.
Note: Intuit recommends using the Quickbooks Component Repair Tool before resorting to the File Doctor if Quickbooks is not installing or loading properly. Doing so will troubleshoot Windows-related programs, ensuring the error is in fact caused by Quickbooks and not your operating system.
Common Errors Fixed By File Doctors
Intuit’s File Doctor program is sort of a “catch all” repair tool. It can be used to fix everything from error 6000 and other error XXXX messages to solving bugs that prevent company files from being opened. If you’re having difficulty opening your company file, run the File Doctor tool to see it fixes the problem. It only takes a couple of minutes to run the tool, but doing so could prevent you from having to perform a complete reinstallation of your Quickbooks files.
Note: Quickbooks 2014 R5 and up have File Doctor built in; therefore, there’s no need to download the program if you are running this version Quickbooks or newer. Refer to the Intuit help page for more details about setting up and using the built-in Quickbooks File Doctor tool.
Downloading and Using File Doctor
If you are running a version of Quickbooks that’s older than 2014 R5, you’ll need to download File Doctor remotely from this location. When the download is complete (download times vary depending on your Internet Service Provider (ISP) speed and Intuit’s server-side speed), click on the .exe file to begin the installation. File Doctor should open immediately after the installation is complete. If it does not automatically open, double click on the green File Doctor icon to manually run the repair tool.
Upon launching File Doctor, you’ll be prompted to choose one of the following options:
- Repair Both file damage and network connectivity.
- Repair network connectivity only.
If you’re only experiencing a network error, such as failure to open a company file in multi-user mode, choose repair network connectivity only. If your Quickbooks problem is not related to the network, however, you should choose the first option.
Continue through with the File Doctor process as it performs the repair. If all goes well, it should resolve any bugs you were previously experiencing.