
Changing Your Company Name In Quickbooks
 During the initial setup of Quickbooks, you’ll be asked to enter several different fields of information related to your business, including name, address, legal/tax info. While this process is straight forward thanks to Intuit’s convenient EasyStep Interview, some users may find it difficult to change this information later. If you recently restructured your business from a Sole Proprietorship to a S-Corp, for instance, you’ll need to update your Quickbooks information to reflect the new name of your business/company.
Your company’s name is used on a variety of documents within your Quickbooks account, including payroll, 1099, 940, 941, W-2 and W-3. Allowing your company’s old name to remain on your account could adversely affect all of these documents, potentially even voiding them. This is why it’s important for users to update their Quickbooks account to reflect their new business name.
Note: the only Quickbooks entry that cannot be changed is business type. Make sure this is correct when setting up your Quickbooks account.
Thankfully, changing the other business details in your Quickbooks account — including company name — is an easy and straightforward process that should only take a couple of minutes. To change your company name, access the Company menu > Company infromation. Here, you can edit details about your company, including your name. Delete the old name, enter in your new company name, and click Save to confirm the changes. Quickbooks will then instantly update your account and all of the respective forms to reflect your new company name.
If you are subscribed to an automatic payroll service, such as Assisted Payroll or Quickbooks Payroll, you’ll need to log in to your account to update it with your company name. Refer to the payroll service’s guides for more information on how to change your company name.
To prevent erroneous checks from being sent out, you should also adjust the payroll data before the next pay period. This is done by accessing Employees > Send payroll data > check to make sure there are no pending payroll checks > and click Send to issue a payroll of zero dollars.
Quickbooks makes it easy for users to modify their company information. As instructed in this post, it takes just a few quick and easy steps to change your company name, address, and other information. Just remember to double-check your business type when setting up your account, because this is the one entry that cannot be easily changed at a later time.
Should I Choose Quickbooks Online or Hosted Quickbooks?
 Originally founded in 1983 by Scott Cook and Tom Proulx in Mountain View, California, Intuit Quickbooks has quickly become the world’s most popular and widely used accounting software. Intuit’s goal was to “bridge the gap” between professional accountants and business owners, allowing business owners to perform their own full-fledged accounting using the software.
I think it’s safe to say Intuit accomplished this goal, as Quickbooks is powerful enough to accommodate large corporations but still simple enough so that anyone can use it, regardless of prior accounting experience.
If you’re thinking about investing in Quickbooks, one of the decisions you’ll have to make is whether to choose Quickbooks Online or Hosted Quickbooks. Both are excellent options that will allow you to perform your own inventory, payroll, and other accounting-related tasks. However, there are some unique advantages and disadvantages associated with each that users need to be aware of.
Based on the name alone, you might assume Hosted Quickbooks is an offline version of Intuit’s accounting software, whereas Quickbooks Online is the online version. In reality, though, both Quickbooks Online and Hosted Quickbooks are offered online, meaning you can access and use them from practically any Internet-connected computer or device.
Now for the million dollar questions: what’s the difference between Quickbooks Online and Hosted Quickbooks? Hosted Quickbooks is technically a desktop version of Quickbooks hosted online by an authorized third-party company, such as MyVao. Quickbooks Online, on the other hand, is limited strictly to Simple Start, Essentials and Plus. So if you chose Quickbooks Online, you’ll be limited to using Quickbooks Online Simple Start, Essentials or Plus, which may or may not be a problem depending on the size of your business and your accounting needs. Quickbooks Online costs less, but at the same time it also comes with fewer features and “goodies.”
But there are other advantages to using Hosted Quickbooks, such as the superior technical/customer support. With Hosted Quickbooks, clients receive two layers of support: one through Intuit and another through the hosted company. Should an issue ever arise with your software or account, profession technicians will be standing by ready to fix it.
Both Hosted Quickbooks and Quickbooks Online can be accessed over the Internet. With Quickbooks Online, clients log in from their web browser, whereas Hosted Quickbooks clients use a remote connection terminal. Of course, this is a small difference when compared to the other nuances mentioned here.
A Look Back at The History of Cloud Computing
Cloud computing — the process of delivering computing as a service rather than a product — has changed the face of modern-day computing infrastructures. Both businesses and consumers alike now use the power of the cloud to improve efficiency and protect against data loss. While cloud computing has just recently picked up momentum in terms of mainstream use, the technology has been around for quite some time. This week, we’re going to take a look back at the history of cloud computing, revealing its origins and where it’s headed.
Did you know that the concept of cloud computing dates back to the 1950s? While no one knows who exactly is responsible for coining the term “cloud computing,” the concept was first seen in the 50s, when mainframe computers were used as computing hubs for client and terminal computers. The client and terminal computers did not, however, feature processors; therefore, they relied on the computing power of the mainframe units. Although rudimentary at the time, this was essentially a barebones cloud computing setup.
Fast forward to the 1960s, computer scientist John McCarthy discussed the possibility of computers be organized and used as a “public utility.” McCarthy had the bold idea of setting up a large infrastructure in which computing power could be sold as a utility, such as electricity, gas, water, etc. This idea remains on the forefront of the computing world through the 60s, 70s and 80s, but it ultimately faded into the abyss as demand for this technology died. Although McCarthy’s idea ultimately ceased to take shape, it laid the groundwork for modern-day cloud computing.
It wasn’t until the 1990s when cloud computing began to peak its head into mainstream use. Telecommunications companies during this era began to offer customers Virtual Private Network (VPN) services, which were basically private networks set up within a public network (often used for privacy reasons). VPNs are essentially a form of cloud computing since the user is routed through a network within a network.
Computer hardware manufacturers began to embrace the use of cloud computing by optimizing components for faster speeds and greater efficiency. Today, thousands of services and programs leverage the power of cloud computing. It’s an otherwise simple concept that reduces computing power waste by sending resources to connected clients. Hosted Quickbooks is one such example of cloud technology, in which third-party servers perform the computing remotely while the client simply logs in to perform his or her accounting.
How To Back Up Quickbooks To a Flash Drive
 Hope for the best but prepare for the worst, is usually a good mantra for business owners to follow. Investing a small portion of your time and energy into creating backups of your Quickbooks files will give you the peace of mind knowing that your data is safe in the event of a crash or hardware failure. Let’s hope that nothing happens to your computer or the server storing your data, but if something does happen, you’ll have a backup copy ready to replace the lost data.
Quickbooks allow users to back up their files on a variety of different devices, including local hard drives, CDs, DVDs, external hard drives, and of course USB flash drives. Many users prefer USB flash drives due to their sheer versatility and ease of use. These small pocket-sized devices can be plugged into any practically any computer — assuming it has a USB port (which most modern-day computers do).
To back up your Quickbooks data, open the respective company file (.QBW format) and insert the USB flash drive into your computer’s USB port. Next, click on File > Create backup. This will open the Quickbooks backup wizard, assisting you in the backup process.
Assuming you want to back up your files on the USB flash drive, choose local backup and select the save destination (usually titled ‘Removable storage device’). Select Next and choose whether to back up the data now or at a later time. Quickbooks allows users to schedule backups for a later time, or you can even create a routine backup schedule to perform the backup at a particular time each week. Don’t worry too much about these settings for now, as you can always go back and adjust them in the future. Select Save it now to perform the backup and save the data to your USB flash drive.
Note: you can modify the default name of the backup file by typing the preferred name in the File name field. To change the default destination, click the drop-down arrow next to save and choose the preferred destination.
After completing the steps listed above, click Save to begin the backup process. All Quickbooks backup files are saved in the .QBB extension. Do attempt to change or modify this extension in any way, as doing so may trigger compatibility problems. When the backup is complete, Quickbooks will display a message notifying you of its completion along with the destination of your new backup file.
To view a video tutorial for the process above please see below or visit the following link: https://www.youtube.com/watch?v=DYIabNNLTok
Help! My Quickbooks Is Running Slow
 Does your Quickbooks software run exceptionally slow or even freeze during use? It’s hard to perform your normal accounting duties when you’re forced to wait for the software to respond. While Intuit has done a remarkable job optimizing its various Quickbooks products for performance, some users may still experience slow speeds.
Upgrade Your Computer
The larger your Quickbooks company file (.QBW), the more resources will be required to operate it. Don’t assume that your 10-year-old desktop or laptop computer is capable of running Quickbooks. While it may perform basic tasks just fine, the ever-increasing resource requirements could eventually bog it down. Upgrading the processor and RAM, however, are two components that can make a world of difference in your computer’s speed, and subsequently, the speed of your Quickbooks operations.
Condense File Tool
If Quickbooks initially ran fast but has recently slowed down, the problem could be related to an oversized company file.
Quickbooks offers a simple solution to this problem with its Condense File tool. To access this tool, select File > Utilities > Condense Data. This removes transaction details before a specified date while creating a backup archive of the original in case you need this data later. According to Intuit, “Condensing your company file affects it significantly,” which is a pretty bold statement, so make sure you take advantage of this feature if you are struggling with slow speeds.
Use Hosted Quickbooks
Arguably, one of the most effective ways to speed up Quickbooks is to use the hosted version of the software. Not to be confused with Quickbooks Online, Hosted Quickbooks is a service in which desktop versions of Quickbooks — QuickBooks Pro, QuickBooks Premier, QuickBooks Accountant Edition, QuickBooks Enterpise Solutions, and QuickBooks Point of Sale — are hosted on servers maintained by authorized third-party companies, such as MyVao.com.
Check For Conflicting Problems With Third-Party Programs
Another possible reason why your Quickbooks is running slow is because of conflicting third-party programs. Virus scanners, firewalls, anti-adware programs, etc. may all interfere with the normal operations of Intuit Quickbooks.
First, temporarily disable anti-virus software installed on your computer (usually the most common culprit). Next, run Quickbooks while paying attention to whether or not the speed problem is fixed. If Quickbooks is not running at its normal speed, go back into the anti-virus software’s settings to place an “exception” for Quickbooks. This will essentially bypass Quickbooks to allow the anti-virus program to continue running without interfering with Quickbooks.
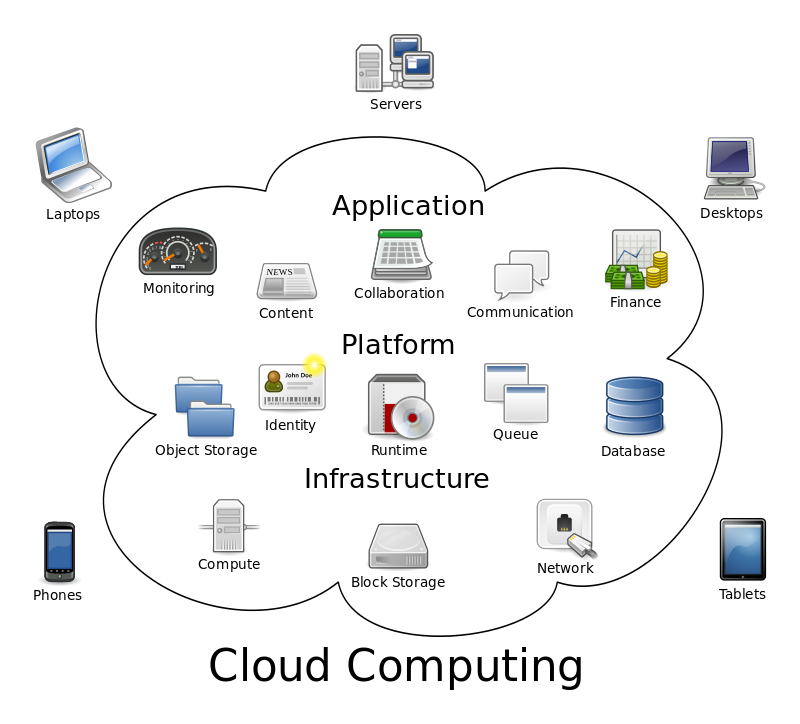
Why Businesses Should Embrace Cloud Computing
Cloud computing is a term that’s become all-too familiar in today’s ever-connected world of digital technology. From next-gen video game consoles like the Xbox One and PlayStation 4 to software applications and programs, cloud computing is everywhere you look. Even in the midst of this newfound popularity, however, many people are left scratching their head as they try to understand what exactly it is.
The short definition of cloud computing — which is also the easiest to understand — is that it’s computing power offered as a service rather than physical hardware. In other words, it features a central hub of high-end computers and/or servers that perform the computing operations of connected users. The “cloud” refers to this hub, which is usually compatible with a variety of different devices (desktop computers, laptops, smartphones, tablets, etc.).
There are several different reasons why businesses should embrace cloud computing technology, one of which is ease of maintenance. Cloud computing applications and programs are easier to maintain since they are only installed on the central hub (AKA the cloud). When an update is required, the operator must only perform maintenance on the cloud as opposed to updating hundreds or even thousands of client devices. This alone is reason enough for many businesses to invest in a cloud-based network solution.
Cloud computing is typically a more cost-effective approach to setting up an infrastructure. The resources are allocated more efficiently to prevent waste. Costs of cloud computing are also lowered since there’s less maintenance required, a benefit we previously discussed.
But the benefits of cloud computing for businesses don’t end there. Another reason why so many businesses prefer this type of setup is because it provides greater security. With everything stored on a central hub, there’s less risk for malicious attacks. IT teams can easily set up firewalls and perform regular security maintenance to prevent against malicious attacks.
Arguably, the greatest benefit of all is the simple fact that users can log into the cloud from a variety of different computers and devices. Assuming they have the proper login credentials to the cloud, users can access it from any connected to device. If an employee is vacationing out of state and needs to access his or her files to make an emergency change, they can do so by logging into the cloud from an internet-connected computer or device.
Did we leave out any other benefits of cloud computing for businesses? Let us know in the comments section below!
How To Fix The Quickbooks Runtime Error
 Do you experience the following Runtime error when attempting to open and/or use Quickbooks? Runtime Error! Errors such as this are frustrating to say the least, but it’s even more frustrating when you’re able to solve them. With a little bit of troubleshooting, however, you can resolve the Runtime error and regain full control and use of your Quickbooks software.
Restart Your Computer
First and foremost, you should restart your computer to see if it fixes the Runtime error. The steps required for performing a restart vary depending on the operating system, but most recent versions of Windows can be restarted by accessing File > Shut down/restart computer. Once your computer reboots, launch Quickbooks once again to see if the problem persists.
Run Quickbooks With No Data
Intuit also recommends launching Quickbooks with no data to resolve the Runtime error. Make sure QBW.EXE is NOT running by pressing Ctrl+Alt+Delete and browsing through the active processes. If you notice QBW.EXE listed, stop it by right clicking and choosing End process now. Next, right-click on the Quickbooks icon, press and hold Ctrl and click Open. You will now have access to Quickbooks without data being connected to the account.
Suppress Open Windows
A third possible solution to the Runtime error is to suppress open windows. Once again, check to make sure QBW.EXE is not running on your computer by pressing Ctrl+Alt+Delete. After verifying that QBW.EXE is not running, right-click on the Quickbooks icon, press and hold Ctrl and click Open. You should now press and hold the Alt button from the No Company Open Screen. Continue to hold the Alt key and press open to launch your company file. This essentially opens your company file but prevents all other windows from opening.
Rename QBW.INI File
As a last resort, you can attempt to rename the QBW.INI file to fix the dreaded Runtime error. Locate the file on your computer by using the Windows file search tool or by manually navigating to the appropriate location. Upon locating QBW.INI, right-click and choose rename. Intuit recommends renaming the file to .OLD extension, so your file should be QBW.OLD. Press Enter to save the changes.
Go ahead and launch Quickbooks like you normally would after renaming the QBW file. Hopefully, the new file extension will resolve the Runtime error, allowing you to once again access and use your Quickbooks software.
Converting an Accountant’s File To a Company File
 An accountant’s file (.qba or .qbx file formats) is a special type of file in Quickbooks which allows accountants, hence the name, to perform work on the account at the same time as other workers. The file is given a diving date — a starting and ending period for which changes are allowed — and there are certain restrictions on what the accountant can edit and what other workers can edit.
Think of an accountant’s file as a way to allow your accountant to perform work within Quickbooks at the same time as you or another worker. When two or more people are modifying an account at the same time, problems usually arise. Quickbooks, however, addresses this issue with the use of accountant’s copy files. The accountant is given limited access to the specified time period within the dividing date.
But what happens if you want to turn an accountant’s file to a traditional company file (.qbw)? Thankfully, Quickbooks makes conversions a quick and easy process that should only take a few minutes. By following the steps mentioned below, you can successfully convert your accountant’s file to a full-service company file.
Note: if a worker is client is running a newer version of Quickbooks, he or she may not be able to open the company file. This is why it’s important to cross-reference software versions before sending a company file.
To convert an accountant’s file to a company file, fire up Quickbooks and access Accountant’s Copy > Convert Accountant’s Copy to Company File/QBW. Select the accountant’s file that you wish to convert from the available options, enter a file name and location for the new company file, and click Save.
The final step in converting an accountant’s file to a company file is to remove the accountant’s copy file restrictions. This basically removes the limitations previously imposed on the account, providing full access to you or the respective client once again. Intuit recommends users consult with their accountant before removing file restrictions. Assuming you are given the green light, access File > Accountant’s Copy > Remove Restrictions. Confirm that you wish to make the changes by clicking Ok. Quickbooks will now remove the restrictions on the accountant’s file.
Note: with restrictions removed, you and your accountant will no longer be able to work simultaneously on the same file. Enabling the restrictions will reverse this change, however.
How To Make an Employee Inactive In Quickbooks
 Unless your business operates under the legal structure of a sole proprietor or one-man LLC or corporation, you’ll probably find yourself in a position where you need to remove an employee from Quickbooks. Allowing employees whom no longer work for your business to remain on the payroll could result in paychecks routinely sent to them. This issue is easily fixed, however, by adjusting some of the settings in your Quickbooks account.
The preferred solution to the scenario mentioned above is to set the employee to inactive. This keeps all previous records of the employee and any paychecks sent to him or her, but it also removes from the employee from the Active Employees list; thereby, eliminating the possibility of accidental paychecks being sent to him or her.
To make an employee inactive, launch your Quickbooks program and access the Employee Center by clicking the respective icon. Next, click on the employees tab to view all of your active and inactive employees. Scroll through the list until you find the employee whom you wish to make inactive, double-click on his or her name, and click the checkbox next to the option “Employee is inactive.” Congratulations, you’ve just set the employee to inactive! Sorry if you were expecting more, but that’s all it takes to deactivate an employee in Quickbooks.
So, what should you do if the employee wishes to return to your company/business as a paid worker? One option is to create an entirely new employee handle for him or her under your Quickbooks account. Being that all of the necessary information is already available in your account, however, the smarter approach is to simply reactivate the employee’s account.
To reactivate an employee, access the Employee Center once again, followed by clicking on the employee tab. Next, click the drop-down arrow at the top of the list and select All Employees. Any inactive employees in your Quickbooks account will have a large X next to their names. If you wish to make an inactivate employee activate again, double-click his or her name, and lastly, click on the box next to the option “Employee is inactive” (note: there should not be a check mark located in this box).
Quickbooks makes it a breeze to set employees to inactivate and to reactivate them. While most users take the longer, more tedious route of completely deleting employees, using the method described here is much easier.